

3d Printer Hot End Design Diy
Sometimes advances happen when someone realizes that a common sense approach isn't the optimal one. Take radio. Success in radio requires bigger antennas and more power, right? But cell phones exist because someone realized you could cram more people on a frequency if you use less power and smaller antennas to limit the range of each base station. With FDM 3D printing, smaller nozzles were all the rage for a while because they offer the possibility of finer detail. However, these days if you want fine detail you should be using resin-based printers and larger nozzles offer faster print times and stronger parts. The Volcano hotend started this trend but there are other options now. [Stefan] over at CNC Kitchen decided to make his own high flow nozzle and he claims it is better than other options.
Don't get too carried away with the DIY part. As you can see in the video below, he starts with a standard nozzle, so it is really a nozzle conversion or hack. The problem with high flow isn't the hole in the nozzle. It is melting the plastic fast enough. The faster the plastic moves through the nozzle, the less time there is for it to melt.
Continue reading "DIY High Flow 3D Printing Nozzle" →
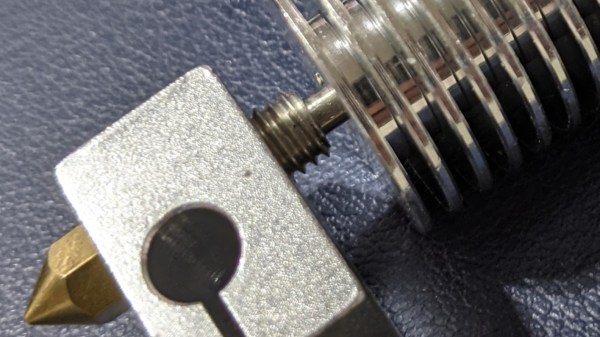
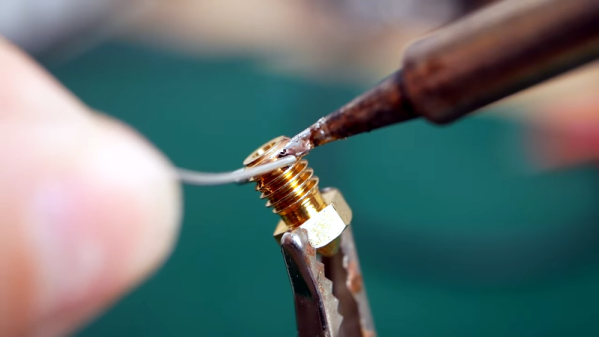
My son, Patrick, has observed on more than one occasion that I do not like 3D printing. That may sound odd, because I built a printer back in 2012 and since then I've built a lot of printers and I currently have at least three in my lab. But Patrick correctly realized that I don't actually enjoy printing things that I need. What I do enjoy is building, fixing and even more importantly improving the printers themselves. If you are reading Hackaday, you probably know how that is. This is the story of an upgrade gone bad, although the ending is happy enough. If you've ever thought about moving from a traditional hot end to an all-metal hot end, you might want to hear me out and maybe I can save you some trouble.
A few years ago, I picked up an Anet A8 for a really low price. As printers go, it is adequate. Not bad, but not amazing. But it is a fun printer because you really need to do some work on it to brace the acrylic frame and fix other shortcomings. I merrily improved the printer quite a bit over a relatively short period of time and I also bought a bunch of aluminum extrusion to rebuild the frame to the AM8 plans you can find on Thingiverse.
Continue reading "Fail Of The Week: The Metal Hot End Upgrade" →
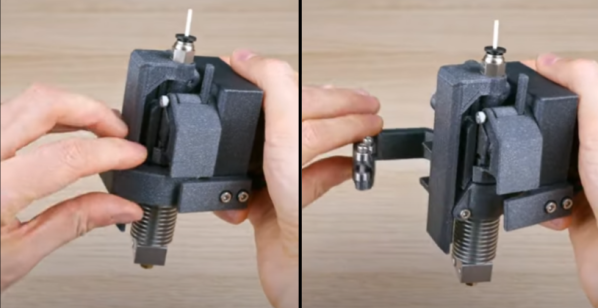
For all of us fascinated with 3D printing, it's easy to forget that 3D printer jams are an extra dimension of frustration to handle. Not to mention that our systems don't really lend themselves well to being easily disassembled for experiments. For anyone longing for a simpler tune-up experience, you're in luck. [MihaiDesigns] is dawning on what looks to be a cleanly designed solution to nozzle-changing, servicing, and experimenting.
The video is only 39 seconds, but this design is packed with clever editions that come together with a satisfying click. First, the active part of the extruder is detachable, popping in-and-out with a simple lever mechanism that applies preload. For consistent attachment, it's located with a kinematic coupling on the side with a magnet that helps align it. What's neat about this design is that it cuts down on the hassle of wire harnesses; tools are set to share the same harness via an array of spring-loaded pogo pins. Finally, a quick-change extruder might be neat on its own, but [MihaiDesigns] is teasing us with an automatic tool change feature with a handy lever arm.
This is a story told over multiple sub-60-second videos, so be sure to check out their other recent videos for more context. And for the 3D printing enthusiasts who dig a bit further into [MihaiDesigns'] video log, you'll be pleased to find more magnetic extruder inventions that you can build yourself.
The world of tool-changing 3D printers is simply brimming with excitement these days. If you're curious to see other machines with kinematic couplings, have a peek at E3D's toolchanger designs, Jubilee, and [Amy's] Doot Changer.
Continue reading "Removable Extruder Pulls Out The Stops On Features" →

At a recent swap meet, [digitalrice] found what appeared to be a like-new QIDI X-Plus 3D printer. It wasn't clear what was wrong with it, but considering it retails for $900 USD, he figured the asking price of $150 was worth the gamble. As you might expect, the printer ended up being broken. But armed with experience and a supply of spare parts, he was able to get this orphaned machine back up and running.
The first and most obvious problem was that the printer's Z axis didn't work properly. When the printer tried to home the axis, one of the motors made a terrible noise and the coupler appeared to be spinning backwards. From his experience with other printers, [digitalrice] knew that the coupler can slip on the shaft, but that didn't appear to be the case here. Removing the stepper motor and testing it in isolation from the rest of the machine, he was able to determine it needed replacing.
Unfortunately, the spare steppers he had weren't actually the right size. Rather than waiting around for the proper one to come in the mail, he took an angle grinder to the stepper's shaft and cut off the 5 mm needed to make it fit, followed by a few passes with a file to smooth out any burrs. We're not sure we'd recommend this method of adjustment under normal circumstances, but we can't argue with the results.
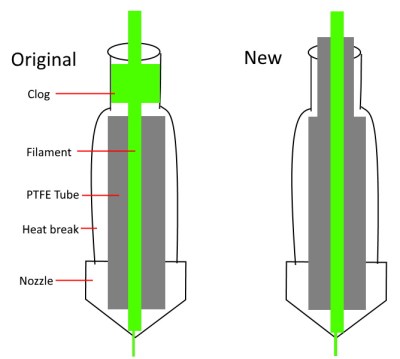
The replaced Z motor got the printer moving, but [digitalrice] wasn't out of the woods yet. At this point, he noticed that the hotend was hopelessly clogged. Again relying on his previous experience, he was able to disassemble the extruder assembly and free the blob of misshapen PLA, leading to test prints which looked very good.
But success was short lived. After swapping to a different filament, he found it had clogged again. While clearing this second jam, he realized that the printer's hotend seemed to have a design flaw. The PTFE tube, which is used to guide the filament down into the hotend, didn't extend far enough out. Right where the tube ended, the filament was getting soft and jamming up the works. With a spare piece of PTFE tube and some manual reshaping, he was able to fashion a new lining which would prevent the filament from softening in this key area; resulting in a more reliable hotend than the printer had originally.
It's great to see this printer repaired to working condition, especially since it looks like [digitalrice] was able to fix a core design flaw. But a broken 3D printer can also serve as the base for a number of other interesting projects, should you find yourself in a similar situation. For example, replacing the extruder assembly with a digital microscope can yield some very impressive results.
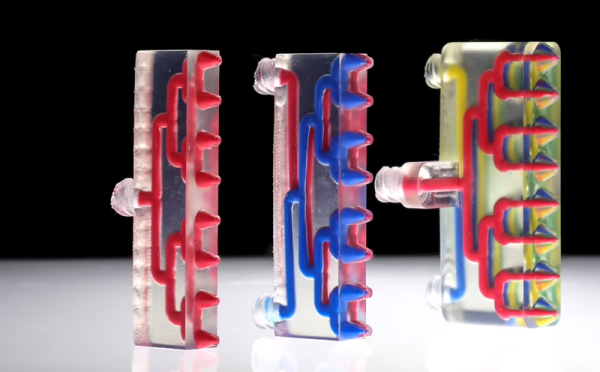
When you zoom in on a fractal you find it is made of more fractals. Perhaps that helped inspire the Harvard 3D printers that have various arrays of mixing nozzles. In the video below you can see some of the interesting things you can do with an array of mixing nozzles. The coolest, we think, is a little multi-legged robot that uses vacuum to ambulate across the bench. The paper, however, is behind a paywall.
There are really two ideas here. Mixing nozzles are nothing new. Usually, you use them to mimic a printer with two hot ends. That is, you print one material at a time and purge the old filament out when switching to the new filament. This is often simpler than using two heads because with a two head arrangement, both the heads have to be at the same height, you must know the precise offset between the heads, and you generally lose some print space since the right head can't cross the left head and vice versa. Add more heads, and you multiply those problems. We've also seen mixing nozzles provide different colors.
Continue reading "Multi Material 3D Printing Makes Soft Robot" →
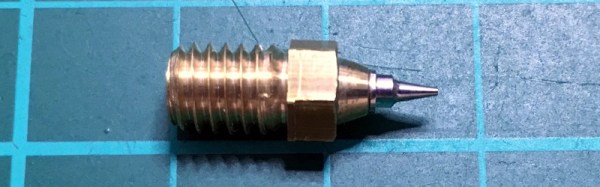
On a fused deposition modeling (FDM) 3D printer, the nozzle size dictates how small a detail you can print. Put simply, you can't print features smaller than your nozzle for the same reason you'd have trouble signing a check with a paint roller. If the detail is smaller than the diameter of your tool, you're just going to obliterate it. Those who've been around the block a few times with their desktop 3D printer may have seen this come up in practice when their slicer refused to print lines which were thinner than the installed nozzle (0.4mm on the vast majority of printers).
 Smaller nozzles exist for those looking to improve their printer's detail on small objects, but [René Jurack] wasn't happy with just putting a finer nozzle on a stock E3D-style hotend. In his opinion it's still a hotend and arrangement intended for 0.4mm printing, and doesn't quite fully realize the potential of a smaller diameter nozzle. After some experimentation, he thinks he's found the solution by using airbrush nozzles.
As [René] sees it, the hotend is too close to the subject being printed when using nozzles finer than 0.4mm. Since you're working on tiny objects, the radiant heat from the body of the hotend being only a few millimeters away is enough to deform what you're working on. But using the long and tapered airbrush nozzle, the hotend is kept at a greater distance from the print. In addition, it gives more room for the part cooling fan to hit the print with cool air, which is another critical aspect of high-detail FDM printing.
Of course, you can't just stick an airbrush nozzle on your E3D and call it a day. As you might expect, they are tiny. So [René] designed an adapter that will let you take widely available airbrush nozzles and thread them into an M6 threaded hotend. He's now selling the adapters, and judging by the pictures he posted, we have to say he might be onto something.
If you're more about brute strength than finesse, you might be interested in outfitting your E3D with a ruby nozzle instead.
Continue reading "High Detail 3D Printing With An Airbrush Nozzle" →
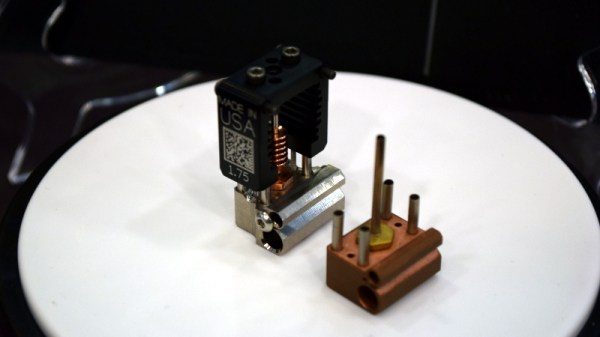
With few exceptions, it seemed like every 3D printer at the first inaugural East Coast RepRap Festival (ERRF) was using a hotend built by E3D. There's nothing inherently wrong with that; E3D makes solid open source products, and they deserve all the success they can get. But that being said, competition drives innovation, so we're particularly interested anytime we see a new hotend that isn't just an E3D V6 clone.
The Mosquito from Slice Enginerring is definitely no E3D clone. In fact, it doesn't look much like any 3D printer hotend you've ever seen before. Tiny and spindly, the look of the hotend certainly invokes its namesake. But despite its fragile appearance, this hotend can ramp up to a monstrous 500 C, making it effectively a bolt-on upgrade for your existing machine that will allow you to print in exotic materials such as PEEK.
We spent a little time talking with Slice Engineering co-founder [Dan], and while there's probably not much risk it's going to dethrone E3D as the RepRap community's favorite hotend, it might be worth considering if you're thinking of putting together a high-performance printer.
Continue reading "ERRF 18: Slice Engineering Shows Off The Mosquito" →
3d Printer Hot End Design Diy
Source: https://hackaday.com/tag/hotend/
Posted by: keetontheut1965.blogspot.com
0 Response to "3d Printer Hot End Design Diy"
Post a Comment