

How To Create A Simple Blog In Php

Table of Context
In this tutorial, we will learn to create a complete blog CMS using PHP and MYSQL database. To create a blog CMS, along with PHP and MYSQL, you should also have knowledge of CSS and HTML , only then a better blog can be made. In these PHP tutorial, we will learn to create a simple and advance blog CMS using PHP. If you are a beginner or a developer, you will be able to easily create and run any blog due to these tutorials. If you are a beginner, then clear the basics first and only then you will be able to create this blog.
In this tutorial, we will understand all the files, folders and database tables from the beginning and will create a simple blog CMS . In the next series, we will add the features that will make it advance.
Create MYSQL database tables for Blog –
Before creating a blog , it is important to understand the database table structure, only then any blog can be successfully created. In this tutorial, we create two tables. One table is created for inserting and displaying blog posts and another table for admin users data.
1. Create an MSYQL database table.
Table Name - techno_blog
In the above table, you can see all the fields related to the blog posts. The articleId should be auto-increment.
2. Create an MYSQL table for Blog Admin –
Table Name - techno_blog_users
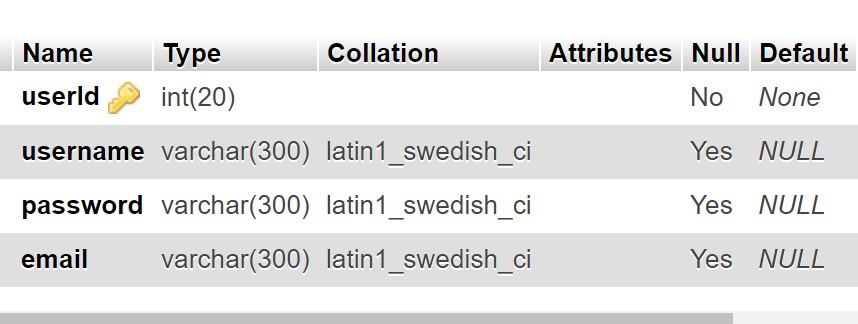
The above table will be used to login to a user, add the new users to the blog .
It is very important to keep the security of the blog, so we create login security to secure the blog from an unknown person. After creating the database, also understand the structure of folders and files, so that you do not face any problem later. Folders and files are managed in such a way to create a blog by PHP programming. If you are the PHP beginner, then you should use the Sublime Text Editor.
Structure of the Blog folders and files –

You must have understood from the above structure that there are separate folders of the admin in which all files related to the blog admin.
All the files other than Admin will work for the interface of the blog. Connect the blog to MYSQL Database.
- Displaying the blog posts on the page using PHP.
Displaying the blog posts listwise on the home page.
Creating the header and footer of the blog
.etc
Create a folder and these files inside the Admin folder –
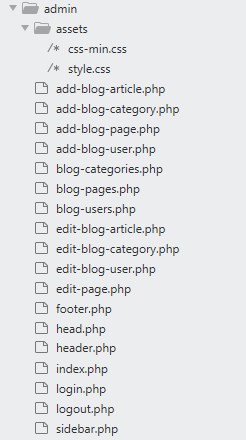
All these files are created to handle the backend of the blog.
like-
- Add a new user
Delate user.
post article
Edit and delete the article etc -
All these operations are held by the administrator only.
Check and create other folders and files. You can see the image below.
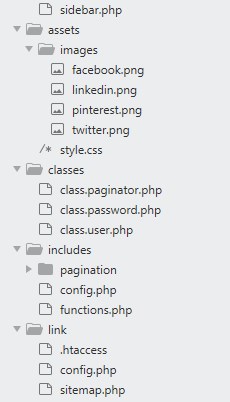
The image above helps to create another file inside another folder. Kindly check and create a blog folder and PHP files carefully.
Now, enjoy the time. You are done the structures.
In any PHP project, first of all, a connection file is created. Here we will use the PHP PDO connection. This file is created under the name of config.php, whose work is done to connect the blog page to the MYSQL database.Create a new PDO connection and set the time zone.
blog/includes/config.php
ob_start(); session_start(); //database details define('DBHOST','localhost'); define('DBUSER','root'); define('DBPASS',''); define('DBNAME','technosmarterblog'); $db = new PDO("mysql:host=".DBHOST.";dbname=".DBNAME, DBUSER, DBPASS); $db->setAttribute(PDO::ATTR_ERRMODE, PDO::ERRMODE_EXCEPTION); //set timezone- Asia Kolkata date_default_timezone_set('Asia/Kolkata'); In the above config.php file code, you have to provide the details listed below –
1. Database Host –
Localhost – localhost
Live server – Check on PHPMYADMIN
2 Database User –
Localhost - root
Live server – define your username
3. Database Password –
Localhost – no need
Live server – Define your password here –
4. Database Name – Define your database name here-
date_default_timezone_set('Asia/Kolkata');
The default time zone is 'Asia/Kolkata' . You can define your local time here –
PHP Date and time functions –
Now, create a function autoload. The function autoload helps to load the classes if needed.
The function handles auto functionality. It checks the file exists or not if the file exists (you can see the if condition ) then include the classpath.
We will create classes later – The autoload() function load the class automatically without including.
//load classes when needed function __autoload($class) { $class = strtolower($class); //if call from within assets adjust the path $classpath = 'classes/class.'.$class . '.php'; if ( file_exists($classpath)) { require_once $classpath; } //if call from within admin adjust the path $classpath = '../classes/class.'.$class . '.php'; if ( file_exists($classpath)) { require_once $classpath; } //if call from within admin adjust the path $classpath = '../../classes/class.'.$class . '.php'; if ( file_exists($classpath)) { require_once $classpath; } } $user = new User($db); At the end in the above config code ,user class is initialized and passed the database connection ($db ), db is created at the time of new PDO connection ) .Now , the class can access the database .
Complete blog connection (config.php) files code-
blog/includes/config.php
<?php ob_start(); session_start(); //database details define('DBHOST','localhost'); define('DBUSER','root'); define('DBPASS',''); define('DBNAME','technosmarterblog'); $db = new PDO("mysql:host=".DBHOST.";dbname=".DBNAME, DBUSER, DBPASS); $db->setAttribute(PDO::ATTR_ERRMODE, PDO::ERRMODE_EXCEPTION); //set timezone- Asia Kolkata date_default_timezone_set('Asia/Kolkata'); //load classes as needed function __autoload($class) { $class = strtolower($class); //if call from within assets adjust the path $classpath = 'classes/class.'.$class . '.php'; if ( file_exists($classpath)) { require_once $classpath; } //if call from within admin adjust the path $classpath = '../classes/class.'.$class . '.php'; if ( file_exists($classpath)) { require_once $classpath; } //if call from within admin adjust the path $classpath = '../../classes/class.'.$class . '.php'; if ( file_exists($classpath)) { require_once $classpath; } } $user = new User($db); ?> Now, we will create Admin panel –
Create a login.php page inside the admin folder. The login system secures the blog from unknown users.
admin/login.php –
Let's discuss the code –
require_once('../includes/config.php'); // user looged in or not if( $user->is_logged_in() ){ header('Location: index.php'); } First of all , we include the config.php file by require_once() function . Instead of require_once() function , you can use the PHP require() function and PHP include() function function. After that , we use the PHP PHP include() functionif condition to check the user logged IN or not if user already logged in , he redirects to the another index page. We will create index page after login process complete. If user does not login , then redirects to the login page. This is headles by the if condition. You can use PHP if else for another statement.
Let's discuss another code part of login page –
//Login form for login if(isset($_POST['submit'])){ $username = trim($_POST['username']); $password = trim($_POST['password']); if($user->login($username,$password)){ //If loogedin , then redirects to the index page header('Location: index.php'); exit; } else { $message = 'Invalid username or Password
'; } } if(isset($message)){ echo $message; }
This is the simple HTML form to hold the user details. We use the post method to handle the HTML form details. If the details are matched, the user redirects to the index page.
Complete PHP login file code -
admin/login.php
<?php //Your connection file require_once('../includes/config.php'); // user looged in or not if( $user->is_logged_in() ){ header('Location: index.php'); } ?> <!DOCTYPE html> <head> Admin Login </head> <body> <?php //Login form for submit if(isset($_POST['submit'])){ $username = trim($_POST['username']); $password = trim($_POST['password']); if($user->login($username,$password)){ //If looged in , the redirects to index page header('Location: index.php'); exit; } else { $message = '
Invalid username or Password
'; } } if(isset($message)){ echo $message; } ?> <form action="" method="POST" class="form"> <input type="text" name="username" value="" required />
<input type="password" name="password" value="" required />
<input type="submit" name="submit" value="SignIn" />
</body> </html> blog/classes/class.user.php
Create the file class.user.php inside the classes folder.
The class user will handle the login process by the user. It deals with the hash password with strong syntax.
Let's discuss the class code –
public function create_hash($value) { return $hash = crypt($value, '$2a$12.substr(str_replace('+', '.', base64_encode(sha1(microtime(true), true))), 0, 22)'); } The above code , handles the hash converted password .It;s totally secured method to create a blog login .
private function get_user_hash($username){ try { //echo $this->create_hash('demo'); $stmt = $this->db->prepare('SELECT password FROM techno_blog_users WHERE username = :username'); $stmt->execute(array('username' => $username)); $row = $stmt->fetch(); return $row['password']; } catch(PDOException $e) { echo ''.$e->getMessage().'
'; } } The function get_user_hash handles the selection of username and password from the techno_blog_users table .
public function login($username,$password){ $hashed = $this->get_user_hash($username); if($this->verify_hash($password,$hashed) == 1){ $_SESSION['loggedin'] = true; return true; } }
The function login handles the login part. If the username and password match, then the session is created. If the username and password do not match, then session does not create. The function login verifies the user details with a hash converted password.
public function logout(){ session_destroy(); } The function logout() handles the user logout operation . It destroys the session . You can understand the PHP session here with deep information .
Complete class user code –
blog/classes/class.user.php
<?php class User{ private $db; public function __construct($db){ $this->db = $db; } public function is_logged_in(){ if(isset($_SESSION['loggedin']) && $_SESSION['loggedin'] == true){ return true; } } public function create_hash($value) { return $hash = crypt($value, '$2a$12.substr(str_replace('+', '.', base64_encode(sha1(microtime(true), true))), 0, 22)'); } private function verify_hash($password,$hash) { return $hash == crypt($password, $hash); } private function get_user_hash($username){ try { //echo $this->create_hash('demo'); $stmt = $this->db->prepare('SELECT password FROM techno_blog_users WHERE username = :username'); $stmt->execute(array('username' => $username)); $row = $stmt->fetch(); return $row['password']; } catch(PDOException $e) { echo ''.$e->getMessage().'
'; } } public function login($username,$password){ $hashed = $this->get_user_hash($username); if($this->verify_hash($password,$hashed) == 1){ $_SESSION['loggedin'] = true; return true; } } public function logout(){ session_destroy(); } } ?> Insert the login details
You should insert the username and password to access the admin panel. Use the query below.
INSERT INTO `techno_blog_users` (`userId`, `username`, `password`, `email`) VALUES (1, 'admin', '0,6Rbsehdf.9I', 'technosmarterinfo@gmail.com');
Now, log in to the admin panel using the details below.
Username - admin
Password - admin
Now, design the blog login form –
Add the style inside the admin/assets folder –
admin/assets/style.css
input[type=text] { width: 15%; padding: 10px 20px; margin: 5px 0; border: 1px solid black; } input[type=password] { width: 15%; padding: 10px 20px; margin: 5px 0; border: 1px solid black; } input[type=submit] { width: 10%; margin-left:100px; padding: 12px 20px; border: 1px solid #555; background-color: green; color:white; } .form{ margin-left: 500px; width: 100%; } .invalid { color:red; font-family: arial; margin-left: 500px; } } The CSS code is used to design the login form and error message with a red color.
Now , create a PHP file inside the admin folder and save as index.php
Admin/index.php –
This is the first file , will open after the login.
require_once('../includes/config.php'); //check login or not if(!$user->is_logged_in()){ header('Location: login.php'); } if(isset($_GET['delpost'])){ $stmt = $db->prepare('DELETE FROM techno_blog WHERE articleId = :articleId') ; $stmt->execute(array(':articleId' => $_GET['delpost'])); header('Location: index.php?action=deleted'); exit; - Include the connection file .
After that, we use the if condition to check the login or not. - If the user does not log in, he redirects to the login page.
- If condition handles this process.
- An unknown user can not open the index.php page without login.
After that, we delete the post by id.
We have already discussed the delete specific data by id using PHP and MYSQL . You can understand this there. We delete the blog post by the id. We already created id as articleId inside the table.
Now, let's discuss another part of code –
<?php try { $stmt = $db->query('SELECT articleId, articleTitle, articleDate FROM techno_blog ORDER BY articleId DESC'); while($row = $stmt->fetch()){ echo '<tr>'; echo '<td>'.$row['articleTitle'].'</td>'; echo '<td>'.date('jS M Y', strtotime($row['articleDate'])).'</td>'; ?> <td> <button class="editbtn"><a href="edit-blog-article.php?id=<?php echo $row['articleId'];?>">Edit </button></td> In the code above , we select the data by the id and display in HTML table . We already discussed , how to insert data and display in HTML table. Complete data is selecting by the articleId and with DESC order . It displays the latest post at first row in the HTML table. We create two buttons for edit and delete the row data by id .
Complete code for index.php file –
admin/index.php
<?php //include connection file require_once('../includes/config.php'); //check login or not if(!$user->is_logged_in()){ header('Location: login.php'); } if(isset($_GET['delpost'])){ $stmt = $db->prepare('DELETE FROM techno_blog WHERE articleId = :articleId') ; $stmt->execute(array(':articleId' => $_GET['delpost'])); header('Location: index.php?action=deleted'); exit; } ?> <?php include("head.php"); ?> Admin Page <?php include("header.php"); ?> <?php //show message from add / edit page if(isset($_GET['action'])){ echo '
Post '.$_GET['action'].'.
'; } ?> <table> <tr> <th>Article Title</th> <th>Posted Date</th> <th>Update</th> <th>Delete</th> </tr> <?php try { $stmt = $db->query('SELECT articleId, articleTitle, articleDate FROM techno_blog ORDER BY articleId DESC'); while($row = $stmt->fetch()){ echo '<tr>'; echo '<td>'.$row['articleTitle'].'</td>'; echo '<td>'.date('jS M Y', strtotime($row['articleDate'])).'</td>'; ?> <td> <button class="editbtn" > <a href="edit-blog-article.php?id=<?php echo $row['articleId'];?>" >Edit </a > </button ></td> <td> <button class="delbtn" > <a href="javascript:delpost('<?php echo $row['articleId'];?>','<?php echo $row['articleTitle'];?>')" >Delete </a > </button > </td> <?php echo '</tr>'; } } catch(PDOException $e) { echo $e->getMessage(); } ?> </table>
<button class="editbtn"><a href='add-blog-article.php'>Add New Article</a></button></p>
<?php include("footer.php"); ?> If you login now, you will get an error of head, header and footer file on the index page. These error files have to be created to remove these errors. Let's create the first file.
Create a PHP file inside the admin folder –
admin/head.php
<!DOCTYPE html> <html lang="en"> <head> <meta charset="utf-8"> admin/header.php
<link href="http://localhost/blog/assets/style.css" rel="stylesheet" type="text/css"> <link href="assets/css-min.css" rel="stylesheet" type="text/css"> </head> <body> - <a href='index.php'>Dashboard</a>
- <a href='blog-users.php'>Users</a>
- <a href="../" target="_blank">Visit Blog </a>
- <a href='logout.php'><font color="red">Logout</font></a>
In the above header.php file code , we added a style from outside the admin folder –
<link href="http://localhost/blog/assets/style.css" rel="stylesheet" type="text/css">
You can see the path
blog/assets/style.css
To see the CSS effect on admin index page , add the style in blog folder that is located outside the admin folder
Create a stylesheet in the assets of the blog folder .
blog/assets/style.css
body { margin: 0; font-family: "Lato", sans-serif; } h1{ color:black; text-decoration: none; } p{ text-align: justify; } .container{ width: 100%; background-color: #FEFEFE; margin: 0 auto; overflow: hidden; } .content{ padding: 10px 100px; width: 60%; float: left; border-left-color: #FFF; border-right-color: #FFF; } .content h1{ text-decoration: none; } .sidebar a { display: block; color: black; padding: 16px; text-decoration: none; } .sidebar a.active { background-color: #4CAF50; color: white; } .sidebar a:hover:not(.active) { background-color: #555; color: white; } .sidebar { float: right; width: 20%; padding-bottom: 10px; background-color: #eee; } .footer{ background-color: #555; color: #fff; clear: both; } .footer a{ color: #F272EC; text-decoration: none; } .readbtn{ transition: all linear 0.2s; background: #66ad44; border: none; font-size: 13px; line-height: 22px; border-radius: 0; padding: 6px 14px; font-family: 'Montserrat', sans-serif; border-radius: 2px; color: white; } .readbtn a{ text-decoration: none; color: #FEFEFE; } @media screen and (max-width: 700px) { .sidebar { width: 100%; height: auto; position: relative; display: none; } .sidebar a {float: left;} div.content {margin-left: 0;} } @media screen and (max-width: 400px) { .sidebar a { text-align: center; float: none; } } .ulclass { list-style-type: none; margin: 0; padding: 0; overflow: hidden; background-color: #333; } li { float: left; } li a { display: block; color: white; text-align: center; padding: 14px 16px; text-decoration: none; } li a:hover { background-color: #111; } The above stylehseet will design the header , footer and the table on admin and blog pages .
Let's complete the blog CSS part. Create css-min.css file inside the admin/assets/ folder .
admin/assets/css-min.css
.message { color:red; font-family: arial; margin-left: 500px; } table { border-collapse: collapse; border-spacing: 0; width: 100%; border: 1px solid #ddd; } th, td { text-align: left; padding: 8px; } tr:nth-child(even){background-color: #E6DEDC} .editbtn{ transition: all linear 0.2s; background: #66ad44; border: none; font-size: 13px; line-height: 22px; border-radius: 0; padding: 6px 14px; font-family: 'Montserrat', sans-serif; border-radius: 2px; color: white; } .editbtn a{ text-decoration: none; color: #FEFEFE; } .delbtn{ transition: all linear 0.2s; background: #FC0527; border: none; font-size: 13px; line-height: 22px; border-radius: 0; padding: 6px 14px; font-family: 'Montserrat', sans-serif; border-radius: 2px; color: white; } .delbtn a{ text-decoration: none; color: #FEFEFE; } .subbtn{ transition: all linear 0.2s; background: #66ad44; border: none; font-size: 13px; line-height: 22px; border-radius: 0; padding: 6px 14px; font-family: 'Montserrat', sans-serif; border-radius: 2px; } .subbtn a{ text-decoration: none; color: #FEFEFE; } This CSS stylesheet will design the various buttons and tables of admin pages .
admin/footer.php
Create a file footer.php and use the code below
Blog Powered By <a target="_blank"href="https://technosmarter.com">Techno Smarter </a>
</body> </html> admin/index.php(Screenshot) 
admin/logout.php
The logout.php file destroyed the session for a user. Instead of the PHP session, you can use the PHP cookies .
Create a PHP file and save inside the admin folder
admin/logout.php
<?php //include config PHP file require_once('../includes/config.php'); //log user out $user->logout(); header('Location: index.php'); ?>
After logout, you will be redirected on the index.php page.
Admin/blog-users.php
In the blog, there is a very important role of users. In this PHP file, all the blog users are displayed and along with creating a delete and edit button from which the blog users can be deleted or edited. Let's understand the code of the blog users PHP file –
<?php //include connection file require_once('../includes/config.php'); //check logged in or not if(!$user->is_logged_in()){ header('Location: login.php'); } // add / edit page if(isset($_GET['deluser'])){ if($_GET['deluser'] !='1'){ $stmt = $db->prepare('DELETE FROM techno_blog_users WHERE userId = :userId') ; $stmt->execute(array(':userId' => $_GET['deluser'])); header('Location: users.php?action=deleted'); exit; } } ?> ?>
1. First of include the config file using require_once() method .
2. If condition checks the user loggedIn or not . If the user logged in , use stay on same page if the user session destroyed (logout) , the user redirects to the login page . We use PHP header() function to redirect via http header .
3. Delete the user by id . We can delete the user by one by one rows . We already discussed how to delete data row by id using php and MYSQL database .
4. After delete the user , it redirects to user page (same page ) using header function .
<?php try { $stmt = $db->query('SELECT userId, username, email FROM techno_blog_users ORDER BY userId'); while($row = $stmt->fetch()){ echo '<tr>'; echo '<td>'.$row['username'].'</td>'; echo '<td>'.$row['email'].'</td>'; ?> <td> <button class="editbtn"><a href="edit-blog-user.php?id=<?php echo $row['userId'];?>">Edit</a> </button> <php if($row['userId'] != 1){> </td> <td><button class="delbtn"><a href="javascript:deluser('<php echo $row['userId'];?>','<?php echo $row['username'];?>')">Delete</a></button> In the code above , we are selecting data from the MYSQL table techno_blog_users using PHP . We select the data by id .We display the username and email with edit and delete button .
We already discuss this process –
Complete code for blog-users.php file –
Create a blog-users.php file inside the admin folder -
admin/blog-users.php
<?php //include connection file require_once('../includes/config.php'); //check logged in or not if(!$user->is_logged_in()){ header('Location: login.php'); } // add / edit page if(isset($_GET['deluser'])){ if($_GET['deluser'] !='1'){ $stmt = $db->prepare('DELETE FROM techno_blog_users WHERE userId = :userId') ; $stmt->execute(array(':userId' => $_GET['deluser'])); header('Location: blog-users.php?action=deleted'); exit; } } ?> <?php include("head.php"); ?> Users- Techno Smarter Blog <?php include("header.php"); ?> <?php //show message from add / edit page if(isset($_GET['action'])){ echo '<h3>User '.$_GET['action'].'.</h3>'; } ?> <table> <tr> <th>Username </th> <th>Email </th> <th>Edit </th> <th>Delete </th> </tr> <?php try { $stmt = $db->query('SELECT userId, username, email FROM techno_blog_users ORDER BY userId'); while($row = $stmt->fetch()){ echo ' <tr>'; echo ' <td>'.$row['username'].' </td>'; echo ' <td>'.$row['email'].' </td>'; ?> <td> <button class="editbtn"><a href="edit-blog-user.php?id=<?php echo $row['userId'];?>">Edit</a> </button> <?php if($row['userId'] != 1){?> </td> <td><button class="delbtn"><a href="javascript:deluser('<?php echo $row['userId'];?>','<?php echo $row['username'];?>')">Delete</a></button> <?php } ?> </td> <?php echo '</tr>'; } } catch(PDOException $e) { echo $e->getMessage(); } ?> </table>
<button class="editbtn"><a href='add-blog-user.php'>Add User</a></button>
<?php include("footer.php"); ?> admin/blog-users.php(screenshot) 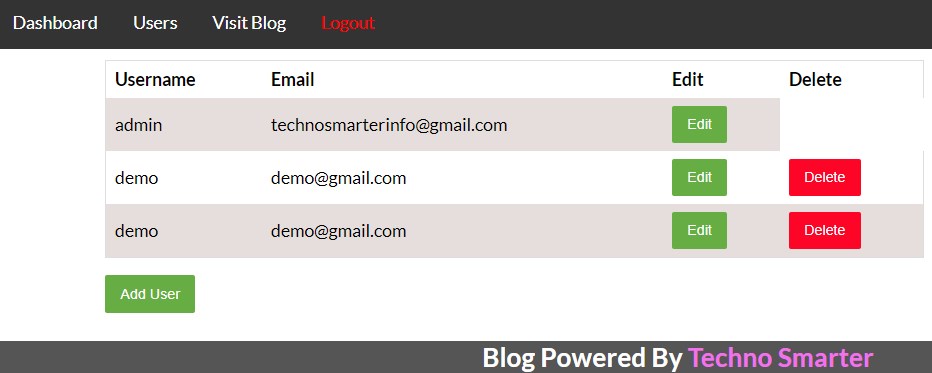
admin/add-blog-user.php
The main blog user can add more users. To add more users, we create another page.
Let's understand the functional part of this page –
//if form has been submitted process it if(isset($_POST['submit'])){ //collect form data extract($_POST); //very basic validation if($username ==''){ $error[] = 'Please enter the username.'; } if($password ==''){ $error[] = 'Please enter the password.'; } if($passwordConfirm ==''){ $error[] = 'Please confirm the password.'; } if($password != $passwordConfirm){ $error[] = 'Passwords do not match.'; } if($email ==''){ $error[] = 'Please enter the email address.'; } if(!isset($error)){ $hashedpassword = $user->create_hash($password); try { //insert into database $stmt = $db->prepare('INSERT INTO techno_blog_users (username,password,email) VALUES (:username, :password, :email)') ; $stmt->execute(array( ':username' => $username, ':password' => $hashedpassword, ':email' => $email )); //redirect to Blog user page header('Location: blog-users.php?action=added'); exit; } catch(PDOException $e) { echo $e->getMessage(); } } }
1. Submit the data on the button click. If condition helps to hold the form data till the button is pressed.
2. Check the form fields are empty or not using nested if statements. If the form fields are empty, then display the message on the page and never execute the insert query. If all fields are fulfilled, the execute the query.
3. Use MYSQL insert query with PHP and insert the form fields in the database table.
This is a major part of this. This form inserts the password in hash format. You have to create a class.password inside the classes folder. The class.password convert the plain text into the hash format.
First of all, create class.password inside the classes folder. The classes folder is located outside the admin folder.
blog/classes/class.password.php –
<?php if (!defined('PASSWORD_DEFAULT')) { define('PASSWORD_BCRYPT', 1); define('PASSWORD_DEFAULT', PASSWORD_BCRYPT); } Class Password { public function __construct() {} /** * Hash the password using the specified algorithm * * @param string $password The password to hash * @param int $algo The algorithm to use (Defined by PASSWORD_* constants) * @param array $options The options for the algorithm to use * * @return string|false The hashed password, or false on error. */ function password_hash($password, $algo, array $options = array()) { if (!function_exists('crypt')) { trigger_error("Crypt must be loaded for password_hash to function", E_USER_WARNING); return null; } if (!is_string($password)) { trigger_error("password_hash(): Password must be a string", E_USER_WARNING); return null; } if (!is_int($algo)) { trigger_error("password_hash() expects parameter 2 to be long, " . gettype($algo) . " given", E_USER_WARNING); return null; } switch ($algo) { case PASSWORD_BCRYPT : // Note that this is a C constant, but not exposed to PHP, so we don't define it here. $cost = 10; if (isset($options['cost'])) { $cost = $options['cost']; if ($cost < 4 || $cost > 31) { trigger_error(sprintf("password_hash(): Invalid bcrypt cost parameter specified: %d", $cost), E_USER_WARNING); return null; } } // The length of salt to generate $raw_salt_len = 16; // The length required in the final serialization $required_salt_len = 22; $hash_format = sprintf("$2y$%02d$", $cost); break; default : trigger_error(sprintf("password_hash(): Unknown password hashing algorithm: %s", $algo), E_USER_WARNING); return null; } if (isset($options['salt'])) { switch (gettype($options['salt'])) { case 'NULL' : case 'boolean' : case 'integer' : case 'double' : case 'string' : $salt = (string)$options['salt']; break; case 'object' : if (method_exists($options['salt'], '__tostring')) { $salt = (string)$options['salt']; break; } case 'array' : case 'resource' : default : trigger_error('password_hash(): Non-string salt parameter supplied', E_USER_WARNING); return null; } if (strlen($salt) < $required_salt_len) { trigger_error(sprintf("password_hash(): Provided salt is too short: %d expecting %d", strlen($salt), $required_salt_len), E_USER_WARNING); return null; } elseif (0 == preg_match('#^[a-zA-Z0-9./]+$#D', $salt)) { $salt = str_replace('+', '.', base64_encode($salt)); } } else { $buffer = ''; $buffer_valid = false; if (function_exists('mcrypt_create_iv') && !defined('PHALANGER')) { $buffer = mcrypt_create_iv($raw_salt_len, MCRYPT_DEV_URANDOM); if ($buffer) { $buffer_valid = true; } } if (!$buffer_valid && function_exists('openssl_random_pseudo_bytes')) { $buffer = openssl_random_pseudo_bytes($raw_salt_len); if ($buffer) { $buffer_valid = true; } } if (!$buffer_valid && is_readable('/dev/urandom')) { $f = fopen('/dev/urandom', 'r'); $read = strlen($buffer); while ($read < $raw_salt_len) { $buffer .= fread($f, $raw_salt_len - $read); $read = strlen($buffer); } fclose($f); if ($read >= $raw_salt_len) { $buffer_valid = true; } } if (!$buffer_valid || strlen($buffer) < $raw_salt_len) { $bl = strlen($buffer); for ($i = 0; $i < $raw_salt_len; $i++) { if ($i < $bl) { $buffer[$i] = $buffer[$i] ^ chr(mt_rand(0, 255)); } else { $buffer .= chr(mt_rand(0, 255)); } } } $salt = str_replace('+', '.', base64_encode($buffer)); } $salt = substr($salt, 0, $required_salt_len); $hash = $hash_format . $salt; $ret = crypt($password, $hash); if (!is_string($ret) || strlen($ret) <= 13) { return false; } return $ret; } /** * Get information about the password hash. Returns an array of the information * that was used to generate the password hash. * * array( * 'algo' => 1, * 'algoName' => 'bcrypt', * 'options' => array( * 'cost' => 10, * ), * ) * * @param string $hash The password hash to extract info from * * @return array The array of information about the hash. */ function password_get_info($hash) { $return = array('algo' => 0, 'algoName' => 'unknown', 'options' => array(), ); if (substr($hash, 0, 4) == '$2y$' && strlen($hash) == 60) { $return['algo'] = PASSWORD_BCRYPT; $return['algoName'] = 'bcrypt'; list($cost) = sscanf($hash, "$2y$%d$"); $return['options']['cost'] = $cost; } return $return; } /** * Determine if the password hash needs to be rehashed according to the options provided * * If the answer is true, after validating the password using password_verify, rehash it. * * @param string $hash The hash to test * @param int $algo The algorithm used for new password hashes * @param array $options The options array passed to password_hash * * @return boolean True if the password needs to be rehashed. */ function password_needs_rehash($hash, $algo, array $options = array()) { $info = password_get_info($hash); if ($info['algo'] != $algo) { return true; } switch ($algo) { case PASSWORD_BCRYPT : $cost = isset($options['cost']) ? $options['cost'] : 10; if ($cost != $info['options']['cost']) { return true; } break; } return false; } /** * Verify a password against a hash using a timing attack resistant approach * * @param string $password The password to verify * @param string $hash The hash to verify against * * @return boolean If the password matches the hash */ public function password_verify($password, $hash) { if (!function_exists('crypt')) { trigger_error("Crypt must be loaded for password_verify to function", E_USER_WARNING); return false; } $ret = crypt($password, $hash); if (!is_string($ret) || strlen($ret) != strlen($hash) || strlen($ret) <= 13) { return false; } $status = 0; for ($i = 0; $i < strlen($ret); $i++) { $status |= (ord($ret[$i]) ^ ord($hash[$i])); } return $status === 0; } } Complete code for add-blog-user.php–
Now, use the code below to add the more blog user.
admin/add-blog-user.php
<?php //include connection file require_once('../includes/config.php'); //loggedin or not if(!$user->is_logged_in()){ header('Location: login.php'); } ?> <?php include("head.php"); ?> Techno Smarter Blog <?php include("header.php"); ?> Add User
<?php //if form has been submitted process it if(isset($_POST['submit'])){ //collect form data extract($_POST); //very basic validation if($username ==''){ $error[] = 'Please enter the username.'; } if($password ==''){ $error[] = 'Please enter the password.'; } if($passwordConfirm ==''){ $error[] = 'Please confirm the password.'; } if($password != $passwordConfirm){ $error[] = 'Passwords do not match.'; } if($email ==''){ $error[] = 'Please enter the email address.'; } if(!isset($error)){ $hashedpassword = $user->create_hash($password); try { //insert into database $stmt = $db->prepare('INSERT INTO techno_blog_users (username,password,email) VALUES (:username, :password, :email)') ; $stmt->execute(array( ':username' => $username, ':password' => $hashedpassword, ':email' => $email )); //redirect to user page header('Location: blog-users.php?action=added'); exit; } catch(PDOException $e) { echo $e->getMessage(); } } } //check for any errors if(isset($error)){ foreach($error as $error){ echo '
'.$error.'
'; } } ?> <form action="" method="post">
<input type="text" name="username" value="<?php if(isset($error)){ echo $_POST['username'];}?>">
<input type="password" name="password" value="<?php if(isset($error)){ echo $_POST['password'];}?>">
<input type="password" name="passwordConfirm" value="<?php if(isset($error)){ echo $_POST['passwordConfirm'];}?>">
<input type="text" name="email" value="<?php if(isset($error)){ echo $_POST['email'];}?>">
<button name="submit" class="subbtn"> Add User</button>
<?php include("footer.php"); ?>
admin/edit-blog-user.php –
There should be an option to add blog data to the MYSQL table as well as to edit it. In the previous tutorials, we had learned the CRUD application in PHP . If you are a beginner, you should understand this also.
Now, understand the edit-blog-user.php file mainline –
if(!isset($error)){ try { if(isset($password)){ $hashedpassword = $user->create_hash($password); //update into database $stmt = $db->prepare('UPDATE techno_blog_users SET username = :username, password = :password, email = :email WHERE userId = :userId') ; $stmt->execute(array( ':username' => $username, ':password' => $hashedpassword, ':email' => $email, ':userId' => $userId )); } else { //update database $stmt = $db->prepare('UPDATE techno_blog_users SET username = :username, email = :email WHERE userId = :userId') ; $stmt->execute(array( ':username' => $username, ':email' => $email, ':userId' => $userId )); } //redirect to users page header('Location: blog-users.php?action=updated'); exit; } catch(PDOException $e) { echo $e->getMessage(); }
In the PHP code above, we use the create_hash() function to convert the plain text to hashcode.
We use the if-else statement to execute the two statements. If the password is changed then execute the first if block if the user does not change in the password then execute the else block.
As you know, we use the update query to update the blog user data by id.
Complete PHP code for edit-blog-user.php file –
admin/edit-blog-user.php
<?php //include config require_once('../includes/config.php'); //if not logged in redirect to login page if(!$user->is_logged_in()){ header('Location: login.php'); } ?> <?php include("head.php"); ?> Edit User- Techno Smarter Blog <?php include("header.php"); ?> Edit User
<?php //if form has been submitted process it if(isset($_POST['submit'])){ //collect form data extract($_POST); //very basic validation if($username ==''){ $error[] = 'Please enter the username.'; } if( strlen($password) > 0){ if($password ==''){ $error[] = 'Please enter the password.'; } if($passwordConfirm ==''){ $error[] = 'Please confirm the password.'; } if($password != $passwordConfirm){ $error[] = 'Passwords do not match.'; } } if($email ==''){ $error[] = 'Please enter the email address.'; } if(!isset($error)){ try { if(isset($password)){ $hashedpassword = $user->create_hash($password); //update into database $stmt = $db->prepare('UPDATE techno_blog_users SET username = :username, password = :password, email = :email WHERE userId = :userId') ; $stmt->execute(array( ':username' => $username, ':password' => $hashedpassword, ':email' => $email, ':userId' => $userId )); } else { //update database $stmt = $db->prepare('UPDATE techno_blog_users SET username = :username, email = :email WHERE userId = :userId') ; $stmt->execute(array( ':username' => $username, ':email' => $email, ':userId' => $userId )); } //redirect to users page header('Location: blog-users.php?action=updated'); exit; } catch(PDOException $e) { echo $e->getMessage(); } } } ?> <?php //check for any errors if(isset($error)){ foreach($error as $error){ echo $error.'
'; } } try { $stmt = $db->prepare('SELECT userId, username, email FROM techno_blog_users WHERE userId = :userId') ; $stmt->execute(array(':userId' => $_GET['id'])); $row = $stmt->fetch(); } catch(PDOException $e) { echo $e->getMessage(); } ?> <form action="" method="post"> <input type="hidden" name="userId" value="<?php echo $row['userId'];?>">
<input type="text" name="username" value="<?php echo $row['username'];?>">
<input type="password" name="password" value="">
<input type="password" name="passwordConfirm" value="">
<input type="text" name="email" value="<?php echo $row['email'];?>">
<input type="submit" name="submit" value="Update">
</form>
<?php include("footer.php"); ?>
Now focus on the blog post. You will able to create a new blog post, edit the blog post and delete blog post with HTML editor.
admin/add-blog-article.php
Add blog post file will be your add post page. It will help you to insert the blog post easily. In this file, we will use the HTML editor to edit the page content.
Let's discuss the PHP code –
//insert into database $stmt = $db->prepare('INSERT INTO techno_blog (articleTitle,articleDescrip,articleContent,articleDate) VALUES (:articleTitle, :articleDescrip, :articleContent, :articleDate)') ; $stmt->execute(array( ':articleTitle' => $articleTitle, ':articleDescrip' => $articleDescrip, ':articleContent' => $articleContent, ':articleDate' => date('Y-m-d H:i:s'), ));
We are already discussed the insert operation using PHP PDO. In this add article file , we insert the blog post into the techno_blog table.
Complete code for add-blog-article.php file
admin/add-blog-article.php
<?php require_once('../includes/config.php'); if(!$user->is_logged_in()){ header('Location: login.php'); } ?> <?php include("head.php"); ?> Add New Article - Techno Smarter Blog <script src="//tinymce.cachefly.net/4.0/tinymce.min.js"></script> <script> tinymce.init({ mode : "specific_textareas", editor_selector : "mceEditor", plugins: [ "advlist autolink lists link image charmap print preview anchor", "searchreplace visualblocks code fullscreen", "insertdatetime media table contextmenu paste" ], toolbar: "insertfile undo redo | styleselect | bold italic | alignleft aligncenter alignright alignjustify | bullist numlist outdent indent | link image" }); </script> <?php include("header.php"); ?> Add New Article
<?php //if form has been submitted process it if(isset($_POST['submit'])){ //collect form data extract($_POST); //very basic validations if($articleTitle ==''){ $error[] = 'Please enter the title.'; } if($articleDescrip ==''){ $error[] = 'Please enter the description.'; } if($articleContent ==''){ $error[] = 'Please enter the content.'; } if(!isset($error)){ try { //insert into database $stmt = $db->prepare('INSERT INTO techno_blog (articleTitle,articleDescrip,articleContent,articleDate) VALUES (:articleTitle, :articleDescrip, :articleContent, :articleDate)') ; $stmt->execute(array( ':articleTitle' => $articleTitle, ':articleDescrip' => $articleDescrip, ':articleContent' => $articleContent, ':articleDate' => date('Y-m-d H:i:s'), )); //add categories //redirect to index page header('Location: index.php?action=added'); exit; }catch(PDOException $e) { echo $e->getMessage(); } } } //check for any errors if(isset($error)){ foreach($error as $error){ echo '
'.$error.'
'; } } ?>
<?php include("footer.php"); ?> In the PHP file code, we specified the editor selector for only content teaxtarea. We do not need to ad editor for a short description. The short description will be displayed in the meta description, not on-page. It will help in SEO of the blog post.
Now, create a blog post edit PHP file to edit a blog post.
admin/edit-blog-article.php
We already discussed the edit operation in the user edit PHP file. Let's understand only the main lines –
$stmt = $db->prepare('UPDATE techno_blog SET articleTitle = :articleTitle, articleDescrip = :articleDescrip, articleContent = :articleContent WHERE articleId = :articleId') ; The update line above will help to update the form field data by articleId .
$stmt = $db->prepare('SELECT articleId,articleTitle, articleDescrip, articleContent FROM techno_blog WHERE articleId = :articleId') ; $stmt->execute(array(':articleId' => $_GET['id']));
First of all, we select the data by id using PHP GET method via page HTTP header.
We select the blog article(post) by the unique id because we already added the edit button on the index.php page.
Complete PHP code for the edit blog post –
admin/edit-blog-article.php
<?php require_once('../includes/config.php'); if(!$user->is_logged_in()){ header('Location: login.php'); } ?> <?php include("head.php"); ?> Update Article - Techno Smarter Blog <script src="//tinymce.cachefly.net/4.0/tinymce.min.js"></script> <script> tinymce.init({ mode : "specific_textareas", editor_selector : "mceEditor", plugins: [ "advlist autolink lists link image charmap print preview anchor", "searchreplace visualblocks code fullscreen", "insertdatetime media table contextmenu paste" ], toolbar: "insertfile undo redo | styleselect | bold italic | alignleft aligncenter alignright alignjustify | bullist numlist outdent indent | link image" }); </script> <?php include("header.php"); ?> Edit Post
<?php if(isset($_POST['submit'])){ //collect form data extract($_POST); //very basic validation if($articleId ==''){ $error[] = 'This post is missing a valid id!.'; } if($articleTitle ==''){ $error[] = 'Please enter the title.'; } if($articleDescrip ==''){ $error[] = 'Please enter the description.'; } if($articleContent ==''){ $error[] = 'Please enter the content.'; } if(!isset($error)){ try { //insert into database $stmt = $db->prepare('UPDATE techno_blog SET articleTitle = :articleTitle, articleDescrip = :articleDescrip, articleContent = :articleContent WHERE articleId = :articleId') ; $stmt->execute(array( ':articleTitle' => $articleTitle, ':articleDescrip' => $articleDescrip, ':articleContent' => $articleContent, ':articleId' => $articleId, )); //redirect to index page header('Location: index.php?action=updated'); exit; } catch(PDOException $e) { echo $e->getMessage(); } } } ?> <?php //check for any errors if(isset($error)){ foreach($error as $error){ echo $error.'
'; } } try { $stmt = $db->prepare('SELECT articleId,articleTitle, articleDescrip, articleContent FROM techno_blog WHERE articleId = :articleId') ; $stmt->execute(array(':articleId' => $_GET['id'])); $row = $stmt->fetch(); } catch(PDOException $e) { echo $e->getMessage(); } ?> <form action='' method='post'> <input type='hidden' name='artic
Please share -
-
-
-
Recommended Posts:-
- How to create SEO friendly URL for Blog posts in PHP? | Part 2
- How to create Sidebar in Blog ? | PHP blog Part 3
- How to display recent posts in Blog using PHP | Part 4
- Create categories in blog using PHP and MYSQL | Part 5
- How to create blog CMS tags in PHP and MYSQL | Part 6
- Create social share buttons in the blog using PHP and MYSQL | Part 7
- Display recommended blog posts | Next 5 rows data in PHP -Part 8
- Display previous blog posts using PHP and MYSQL | Part 9
- Create pages in blog CMS using PHP and MYSQL | Part 10
- Generate sitemap for blog in PHP and MYSQL | Part 11
Previous Posts:-
- Display data from MYSQL database table using PHP and AJAX |filter by
- Validate username and email if already exists in PHP and MYSQL
- Copy one mysql database table to another using PHP
- Total number of rows count using PHP and MYSQL table
- How to create countdown timer using JS,PHP and MYSQL database
Featured Items:-
Complete Blog CMS system in PHP with MYSQL database | PHP scripts
$14
Paypal Payment form in PHP website with MYSQL database | International Payments
$12
Integrate Payumoney payment gateway in PHP website | Source Scripts
$12
How To Create A Simple Blog In Php
Source: https://technosmarter.com/php/how-to-create-blog-using-php-and-mysql-database
Posted by: keetontheut1965.blogspot.com
0 Response to "How To Create A Simple Blog In Php"
Post a Comment